Mastering the Bench Press: Your Ultimate Setup Checklist
If you think the bench press is just about showing off your pecs, think again. The truth is, it’s about how you position your entire body before you even think about lowering that barbell. From your feet to your grip, setting up correctly can make all the difference in your lift—and keeping things safe during your workout.
Today, we’re diving into the nitty-gritty of bench pressing with the guidance of Matt Wenning, a powerlifting legend who’s benched over 600 pounds raw. He’s maintained a 500-plus-pound bench press for over 26 consecutive years, so when he speaks on the topic, you’d better believe we listen.
Let’s break down the key steps that go into setting up for a strong and effective bench press, making sure your muscles engage correctly and your form stays impeccable.
Why Setup Matters
Before we jump into the checklist, let’s take a moment to reflect. Have you ever seen someone struggle with their bench? It’s frustrating—not just for the lifter but for everyone watching. An improper setup can lead to bad form, weak lifts, and even injuries. By paying attention to these details, not only can you maximize your lift, but you’ll also protect your body.
So, let’s get into it! Here’s a step-by-step guide to proper bench press setup.
Step 1: Body Position
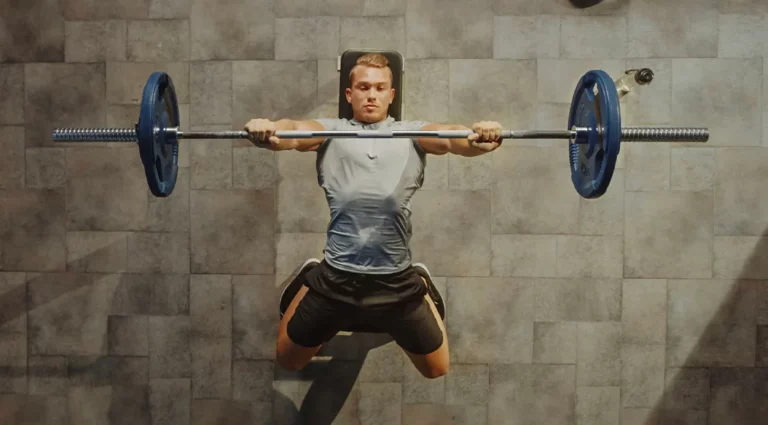
The bedrock of a strong bench press is your body position on the bench. Before even reaching for the bar, make sure you’ve got this right:
- Eyes Under the Bar: Slide yourself up so your eyes are right under or ever so slightly behind the bar.
- Contact Points: Keep your head, upper back, and glutes securely planted on the bench.
Tips:
- Internal Cue: Picture pulling your shoulder blades down into your back pockets.
- External Cue: Set your eyes directly under the bar in the rack.
Wenning emphasizes that getting yourself situated under the bar correctly is vital for a smooth and powerful lift.
Step 2: Foot Position and Drive
Your feet might feel less important compared to your upper body, but they’re your foundation. A solid lower body sets the tone for the press:
- Foot Placement: Plant your feet flat on the floor or on their balls, whatever feels natural. Position them just outside your hips for better stability.
- Leg Drive: Now, here’s the kicker—drive those feet into the floor as if you want to tear it apart. This will help balance your upper body while transferring force effectively.
Tips:
- Internal Cue: Think of pushing through your feet.
- External Cue: Imagine driving the floor away as you press.
If you’re finding your feet sliding around or your hips lifting, it’s time to reset.
Step 3: Rooting and Lower Body Tension
To unleash that raw power, you’ve gotta establish tension through your lower body:
- Screw Your Feet: Create slight external rotation at the hips—this stabilizes your torso and guides your press.
- Squeeze Your Glutes: Lock your pelvis in place.
Tips:
- Internal Cue: Keep those glutes tight and legs loaded.
- External Cue: Spread the floor with your feet.
If you lose your anchor and your knees cave in during the press, don’t hesitate to reset.
Step 4: Grip Width and Hand Position
Now, let’s talk grip, which is crucial for safe and effective lifting:
- Even Grip: Ensure your grip on the bar is uniform. Index fingers should be aligned with the rings on the bar.
- Bar Position: The bar needs to rest low in your palm. You want your wrists stacked over your elbows for maximum stability.
Tips:
- Internal Cue: Crush the bar with your hands.
- External Cue: Visualize bending the bar in half.
If your wrists bend back when you unrack, it’s a red flag. Reset and fix that grip!
Step 5: Scapular Position and Upper Body Tension
Next up, your upper back needs to get involved. A sturdy upper back can cleanly shorten the range of motion:
- Retracted Shoulder Blades: Pull your shoulder blades back and down before you even think about unracking.
- Chest Position: Your chest should naturally rise with this tension.
Tips:
- Internal Cue: Pin your shoulder blades into your back pockets.
- External Cue: Imagine crushing the bench with your upper back.
If your shoulders roll forward as the bar touches your chest, it’s time for a reset.
Step 6: Breathe and Brace
Before you press, get your breath and brace right. This action creates intra-abdominal pressure that stabilizes your spine, protecting you throughout the lift:
- Deep Breath: Inhale deeply into your diaphragm.
- Brace Yourself: Tighten your core as if you’re bracing for a punch.
Tips:
- Internal Cue: Fill your belly with air.
- External Cue: Push your abdominals into your belt.
For some lifters, using a belt can enhance your performance by improving core stability.
Step 7: The Unrack
Finally, the moment of truth—the unrack. Do it right to set the stage for your lift:
- Arms Straight: Keep your arms fully extended.
- Pullover, Not Push: Think about pulling the bar out of the rack instead of pushing it up.
Tips:
- Internal Cue: Keep your arms long and your shoulders tight.
- External Cue: Pull the bar out of the rack.
If you feel any shifting or bending during this stage, reset and tackle it again!
The Green Light Checklist
After running through these steps, take a moment for one final check before pressing:
- Feet rooted and driving into the floor
- Legs tight, knees pushed out
- Glutes engaged, hips on the bench
- Shoulder blades pinned, upper back locked in
- Grip tight and even, wrists stacked over elbows
- Core braced, ribs down
- Bar stacked directly over shoulders
Once everything feels locked in, you’re ready to press with power.
Common Setup Mistakes to Avoid
Not everyone gets it right the first time. Here are some common mistakes that can derail your bench press:
-
Poor Foot Position: Not having your feet secure or placing them on the bench can disrupt leg drive.
- Fix: Keep those feet planted and create tension through them.
-
Loose Upper Back: If your shoulder blades aren’t retracted, it can throw off your bar path.
- Fix: Grab the bar and pull yourself under it to set your upper back correctly.
-
Incorrect Grip and Elbow Position: A too-wide grip or flared elbows can doom your lift.
- Fix: Use a consistent grip width for a straight forearm position.
-
Compromised Unrack: Setting up too far down the bench wastes energy.
- Fix: Position yourself so the bar’s height requires only a small elbow extension to clear.
Why This Matters
So why is all this setup talk important? Every little detail can drastically change the quality of your lift—and prevent injuries along the way. Whether you’re lifting seriously in the gym or just looking to boost your fitness, mastering your bench press setup can empower you to lift heavier and safer.
This process isn’t just about strength; it’s about understanding your body and fostering stability. So next time you hit the bench, remember to check yourself before that weight comes crashing down. Who knows? You might just surprise yourself with what you’re capable of achieving when you set up right.


